Machine Learning How To: Continuous Integration (Part II)

In this article of the Machine Learning How To series, I will delve deeper into the topic of continuous integration. In my previous piece, we explored the process of writing effective unit and integration tests using a combination of Pytest fixtures, Mocks, and FastAPI's TestClient. The article concluded by outlining how to run these tests locally from the root directory of your repository.
In this article, I will cover the important topics of linting, running tests and linting locally using customized command-line commands, and creating workflow YAML files for the CI pipeline. By the end of this article, you will have a better understanding of these key concepts and be able to implement them effectively in your own projects. I will continue to use the code from the mlseries repo as examples.
Linting
Linting is a common practice in software development. It analyses the code's styling, logic and flags issues. Typos, incorrect number of arguments passed to a function, unused variables or imports, incorrect use of tabs, missing closed brackets are some examples of mistakes made while writing code. Linters ensure that these mistakes are caught and fixed before the code gets pushed and/or merged. Especially for projects with multiple contributors, it ensures that the code style is consistent which makes the code more approachable and readable.
There are different options for linting in Python. flake8 is a common one which uses a combination of different linters, PyFlakes, pep8 and Mccabe under the hood. This tool detects both logical and styling issues in the code.
Detecting the issues is not enough especially for styling inconsistencies. For example, it can be inefficient to go to all the files without a new line at the end of the script and add one manually. It is better to use a formatting tool instead. black and isort are two such tools that format the code and sort the imports respectively. Here are the commands I run from the root of my code base for linting:
- Install
flake8,blackandisortin your virtual environment - From the root of the repo inside the terminal, run
flake8 .
One thing thatflake8checks for is the length of the lines. It allows a maximum of 79 characters (this is the PEP8 convention), if you want to ignore this rule, you can add--ignore E501. Another useful argument is the--countargument that prints out the number of discovered issues. - To fix the issues automatically using
black, runblack .from the root of your code base - To keep the order of the imports consistent, run
isort rc .
Custom Command Line Commands with invoke
So far, I've added tests and linting to my repo. To ensure code quality, it's important that I run these checks every time I make changes. However, this requires remembering three separate commands, each with different arguments. Is there an easier way to group these commands into a more memorable and uniform set? Invoke is a library that does this. It allows you to define "task" functions that encapsulate and execute shell commands. This way you can run commands by invoking the task functions and not worry about the actual command-line syntax.
To do this, I create a tasks.py script in the root of my repo with the content below:
# /tasks.py

from invoke import task

file_paths = "ml/ server/ deploy/ shared_utils/ tasks.py"


@task
def tests(cmd):
    cmd.run("pytest")


@task
def lint(cmd):
    cmd.run(f"flake8 --ignore E501 --count --statistics {file_paths}")


@task
def lintfix(cmd):
    cmd.run(f"black {file_paths}")
    cmd.run(f"isort -rc {file_paths}")
As seen, each function is decorated with task which expects a Context object as the first argument to the function. In the code above, I have named this argument, cmd. The context object is used to run shell commands. For example to run flake8, I pass the corresponding command to cmd.run and include any arguments, and file paths as needed. Now instead of running the flake8 command directly from the command line, I can simply run invoke lint which is equivalent to running the command passed to the context object inside the lint task function.
Similarly to run black and isort to format the code, I run invoke lintfix. The task function name can be anything, I have used names that are expressive of the task it invokes.
This is much easier to remember and is expandable to other local shell commands.
How to Create a CI pipeline
In order to make the code more robust to errors, I want linting and tests to run automatically whenever code is pushed to the remote repository. If there aren't any issues, I have the green light to merge my code with the main branch ideally after it has been reviewed by my coworkers.
This is what a CI pipeline is for. It adds an extra verification step to the process of integrating new code and deploying it to live environments. There are many CI tools available. I will be using GitHub Actions since I'm using GitHub as my remote repository. There is detailed documentation on this topic on GitHub's documenation page.
Workflows
The core component of GitHub Actions are workflows. A workflow is the set of configurable instructions in YAML that Actions uses to run one or more jobs. For example, to run tests on the code, I need a workflow that runs the job of checking out my repo, configuring AWS credentials, pulling data from dvc, installing requirements.txt and finally running the tests. Each task under a job, e.g. checking out the code, is called a step and the actual executed task at each step is known as an action.
For the workflows to run, a trigger event needs to be defined for it. An example of an event can be a pull request, or push to a certain branch.
Let's delve into the mlseries workflows. To start, I create a .github/workflows/ directory in the root of the repo. The naming has to be the same for any code base for Actions to work. There can be multiple workflows. I create two, one for linting, lint.yml and one for tests, tests.yml.
The linting workflow
Here's a breakdown of the lint workflow:
- A a new file
lint.ymlto.github/workflows/ - Give the workflow a name:
name: Linting. This will appear under the Actions tab listing all the existing workflows. - Define the triggering event using the keyword
on. I would like linting to run whenever there is a push to the main branch or a pull request to it is made:
on:
  push:
    branches:
      - main
  pull_request:
    branches:
      - main
- Define each job:
i. Give it a name, e.g. lint. This is the name you will see under the Jobs tab after you click on the workflow.
ii. Configure the job to run on a virtual machine. GitHub supports Linux, Windows, and macOS virtual machines
jobs:
  lint:
    runs-on: ubuntu-latest
- Group the steps using the
stepskeyword:
steps:
- Nest each action item under steps:
i. Define a checkout action that will checkout the repo's code. The keywordusesmeans that this step uses an action, particularly version 3 of theactions/checkoutaction to check the repo on the job runner.
ii. Define an installation action: To run flake8 using invoke, we need to install these packages. Note that it is not necessary to use invoke, however, I wanted to keep it consistent with the local setup.- uses: actions/checkout@v3
As seen, I use the keyword- name: Install flake8 run: | python -m pip install --upgrade pip python -m pip install flake8 python -m pip install invokenameto give this action a name. It makes it easier to see what step the runner is at and where it fails.run: |is used to define multi-line run commands
iii. Define the lint action: Similar to running lint locally, I want the runner to runinvoke lint. I pass the command to therunkeyword:- run: invoke lint
Here is the content of lint.yml from putting all the snippets above together:
# /.github/workflows/lint.yml
name: Linting
on:
push:
branches:
- main
pull_request:
branches:
- main
jobs:
lint:
runs-on: ubuntu-latest
steps:
- uses: actions/checkout@v3
- name: Install flake8
  run: |
    python -m pip install --upgrade pip
    python -m pip install flake8
    python -m pip install invoke
- run: invoke lint
The testing workflow
The tests should run everytime there has been a change to any of the scripts in the directories that contain the tests. In this example, the server/ and ml/ directories. To add a workflow for tests, follow the steps below:
- Add a workflow file:
.github/workflows/tests.yml - Give the workflow a name:
name: Run Tests - The tests are dependent on some environment variables to run successfully, e.g. the data file path. These variables can be defined using the
envkeyword:
env:
    DATA_PATH: "data"
    DATA_FILE: "reviews.tsv"
    TRAIN_DATA_FILE: "train_data.parquet"
    TEST_DATA_FILE: "test_data.parquet"
    MODEL_PATH: "model"
    MODEL_FILE: "lr.model"
    AWS_SECRET_ACCESS_KEY_ID: ${{secrets.AWS_SECRET_ACCESS_KEY_ID}}
    AWS_SECRET_ACCESS_KEY: ${{secrets.AWS_SECRET_ACCESS_KEY}}
    ML_BASE_URI: "http://ml:3000"
Note that I didn't copy/paste my AWS credentials for obvious reasons. Instead I added them to my repository secrets and access them using the secrets context. Here's how you can add secrets to your reporsitory:
- Go to the Settings tab in your repo
- Under Security click on "Secrets and variables"
- Select "New repository secret"
- Create a secret Name, e.g.
AWS_SECRET_ACCESS_KEY_ID - Put in the value of your secret
- Add as many secrets needed
- Define the trigger event. I want the tests to run on pushes to the main branch or when pull request are made to the main branch but only if scripts inside
server/and/orml/has been modified. Setting up and running tests can be time consuming and therefore should only be triggered when relevant code changes. I use thepathskeyword to specify the directories that should trigger this workflow (assuming that it is a push to or PR to the main branch) :
on:
  push:
    branches:
      - main
    paths:
      - 'ml/**'
      - 'server/**'

  pull_request:
    branches:
      - main
    paths:
      - 'ml/**'
      - 'server/**'
- Define the job and the virtual machine it should run on:
jobs:
  run-tests:
    runs-on: ubuntu-latest
    steps:
- Nest each action item under steps:
i. Add a step to configure AWS using the repo's secrets. This is necessary for later steps that needs to access the repo's remote S3 to pull the data and model:
ii. Checkout the code:- name: Configure AWS credentials uses: aws-actions/configure-aws-credentials@v1 with: aws-access-key-id: ${{ secrets.AWS_SECRET_ACCESS_KEY_ID }} aws-secret-access-key: ${{ secrets.AWS_SECRET_ACCESS_KEY }} aws-region: us-east-2- uses: actions/checkout@v3
iii. Install the packages necessary forinvoke teststo run. This includes the packages inserverandml's requirements.txt, boto3 and dvc:
iv. Create a- name: Install dependencies run: | python -m pip install --upgrade pip if [ -f ml/requirements.txt ]; then pip install -r ml/requirements.txt; fi if [ -f server/requirements.txt ]; then pip install -r server/requirements.txt; fi pip install boto3 pip install --upgrade dvc[s3]model/directory and pull the model from S3 using dvc:
v. Run the tests:- name: Pull Data from Remote DVC Storage run: | cd ml mkdir model dvc pull ./model/lr.model- name: Run Tests run: | invoke tests
Here's all the above snippets put together:
# /.github/workflows/tests.yml
name: Run Tests
env:
DATA_PATH: "data"
DATA_FILE: "reviews.tsv"
TRAIN_DATA_FILE: "train_data.parquet"
TEST_DATA_FILE: "test_data.parquet"
MODEL_PATH: "model"
MODEL_FILE: "lr.model"
AWS_SECRET_ACCESS_KEY_ID: ${{secrets.AWS_SECRET_ACCESS_KEY_ID}}
AWS_SECRET_ACCESS_KEY: ${{secrets.AWS_SECRET_ACCESS_KEY}}
ML_BASE_URI: "http://ml:3000"
on:
push:
branches:
- main
paths:
- 'ml/**'
- 'server/**'
pull_request:
branches:
- main
paths:
- 'ml/**'
- 'server/**'
jobs:
run-tests:
runs-on: ubuntu-latest
steps:
  - name: Configure AWS credentials
    uses: aws-actions/configure-aws-credentials@v1
    with:
      aws-access-key-id: ${{ secrets.AWS_SECRET_ACCESS_KEY_ID }}
      aws-secret-access-key: ${{ secrets.AWS_SECRET_ACCESS_KEY }}
      aws-region: us-east-2
- uses: actions/checkout@v3
  - name: Install dependencies
    run: |
      python -m pip install --upgrade pip
      if [ -f ml/requirements.txt ]; then pip install -r ml/requirements.txt; fi
      if [ -f server/requirements.txt ]; then pip install -r server/requirements.txt; fi
      pip install boto3
      pip install --upgrade dvc[s3]
  - name: Pull Data from Remote DVC Storage
    run: |
      cd ml
      mkdir model
      dvc pull ./model/lr.model
  - name: Run Tests
    run: |
      invoke tests
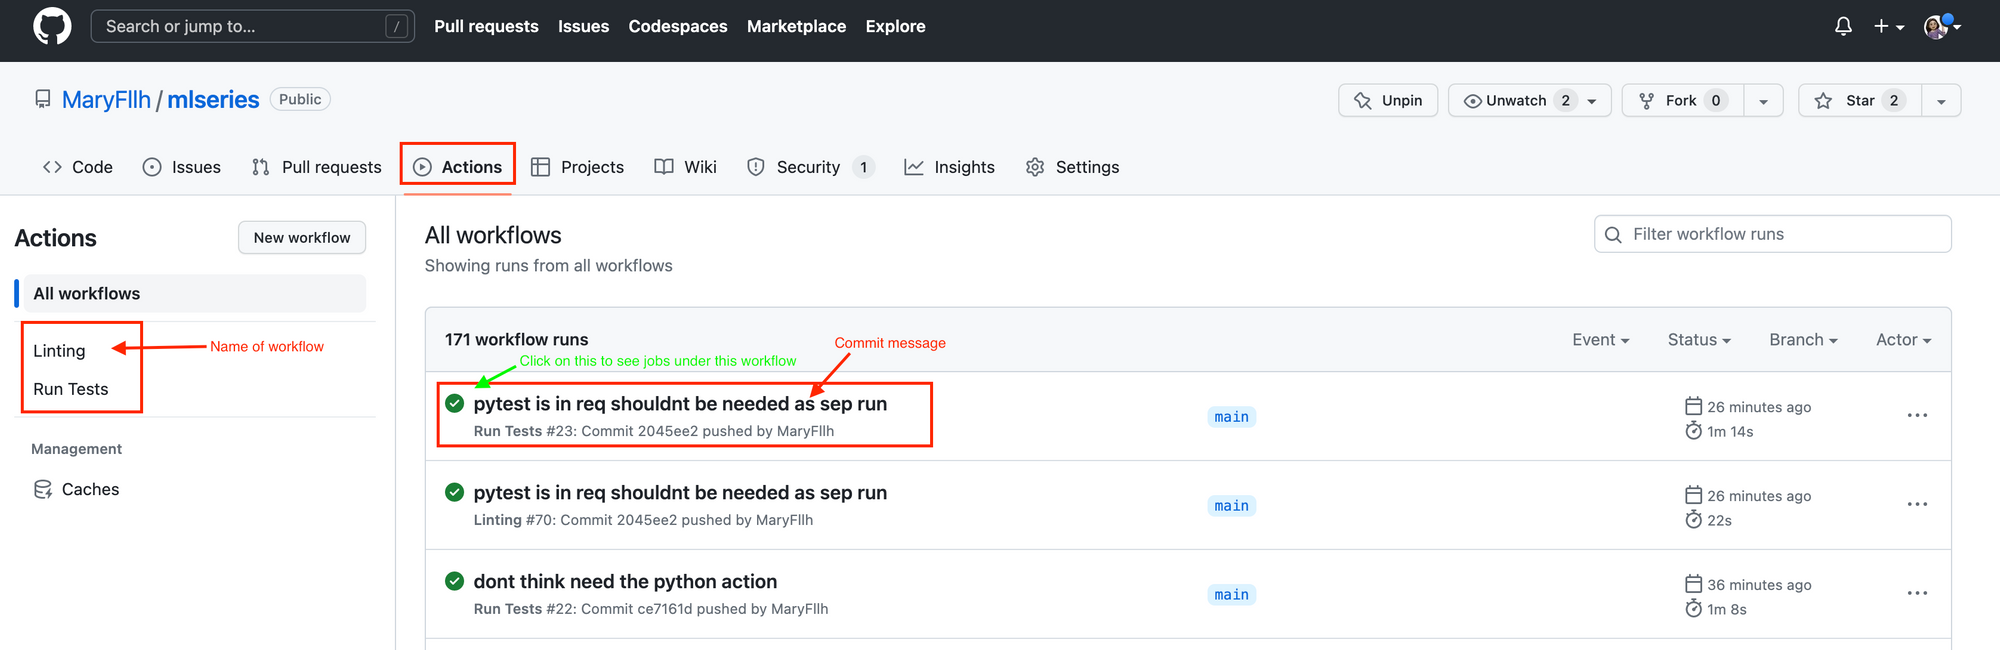
With the defined workflows, whenever there is a trigger event, you will notice jobs running under the Actions tab on Github. Notice the names I used for the workflows are displayed on the left under All workflows. The title of the workflow runs on the right side are the commit messages.
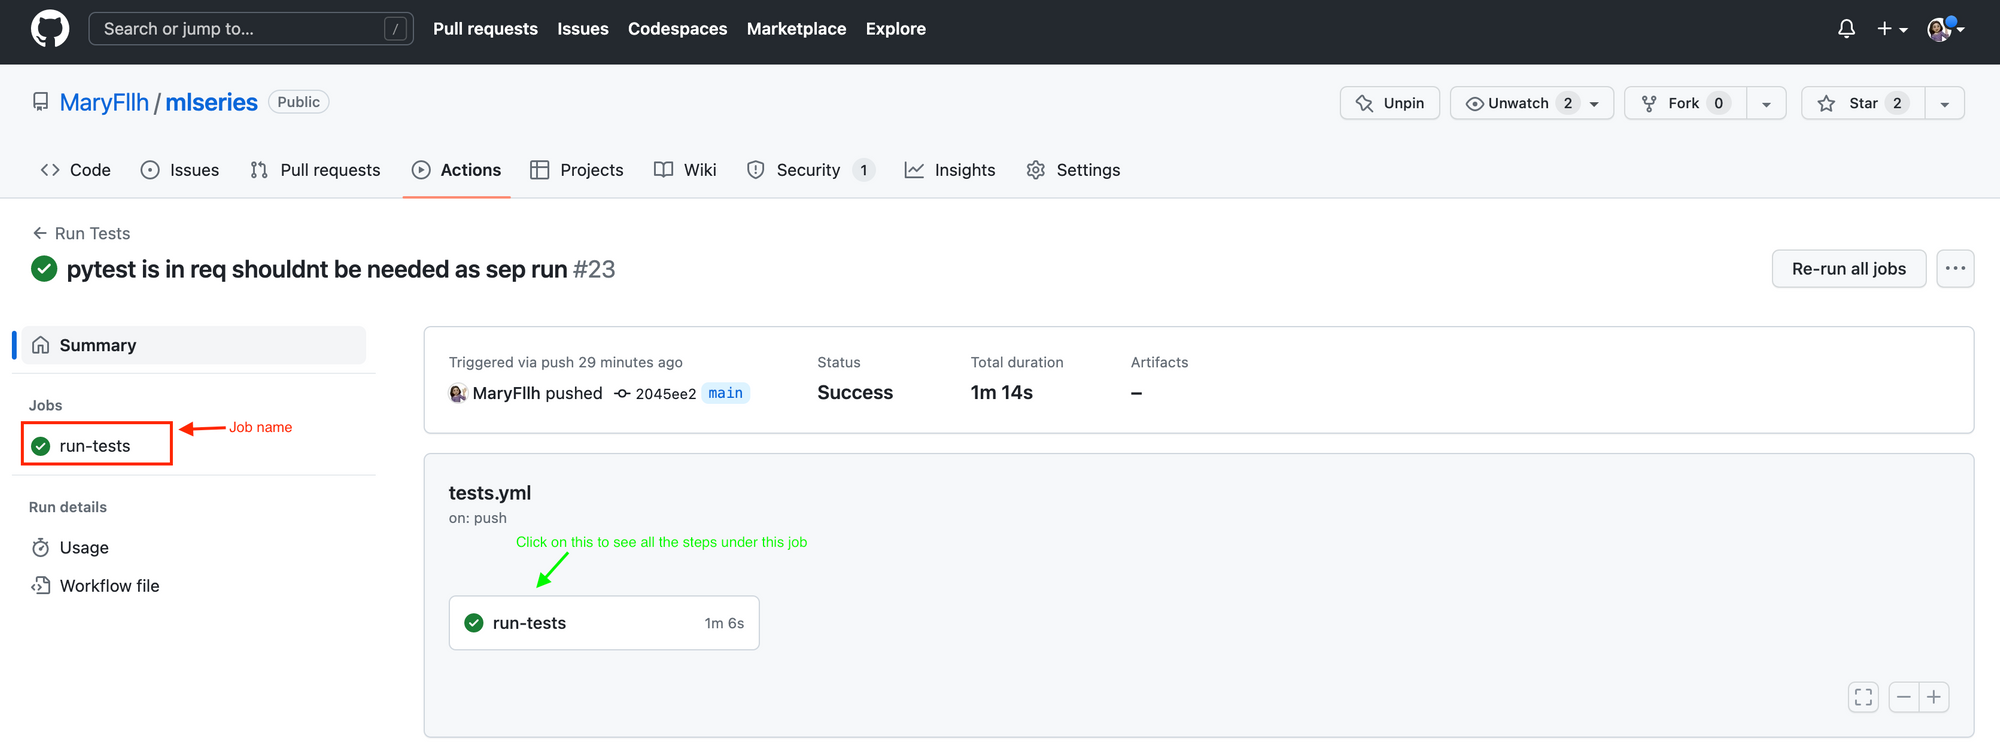
If you click on a certain workflow, you will see all the jobs defined in that workflow on the left. Notice that run-tests was the name I gave to the job inside .github/workflows/tests.yml. I can view all the steps for each job by clicking on the job icon in the middle of the page:
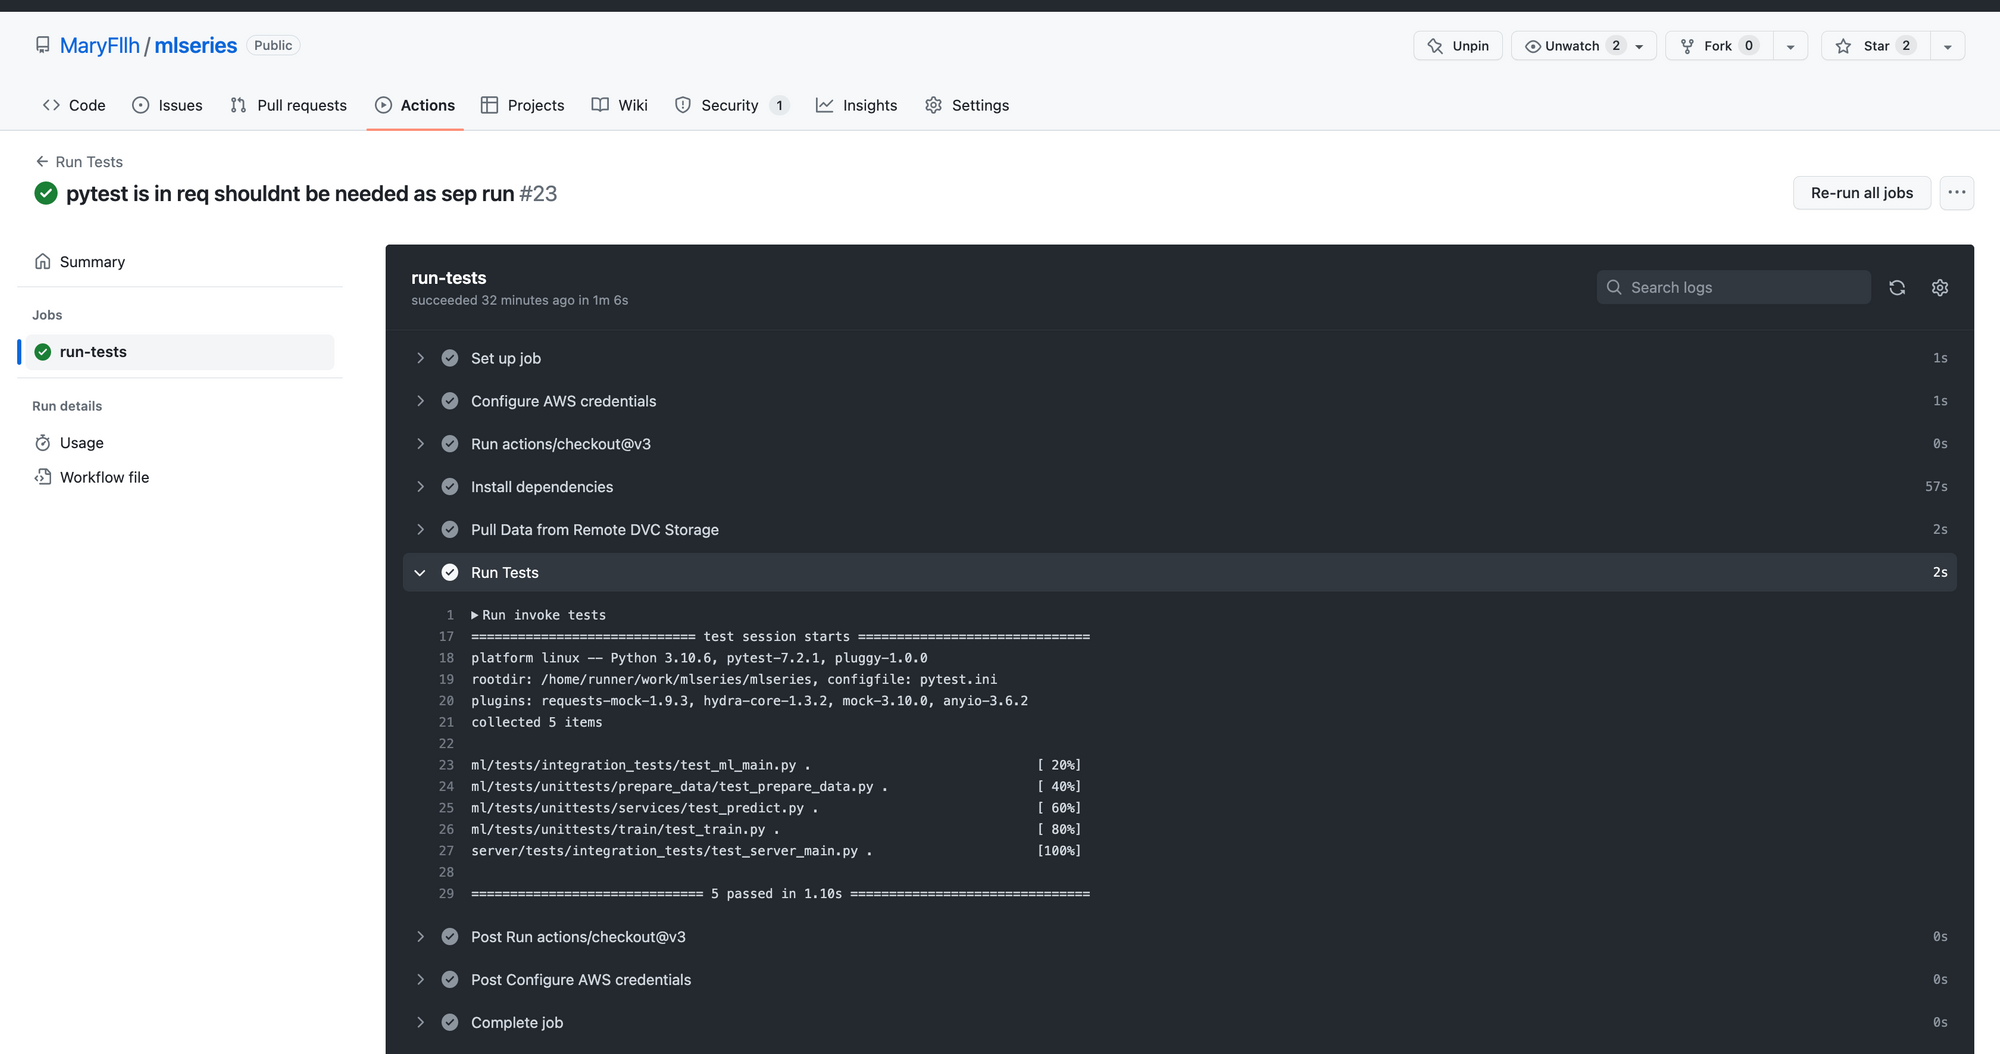
As seen below, all the steps I defined in the workflow are there. You can expand any steps, e.g. Run Tests and see the results. This is useful for when the workflow fails and you need to troubleshoot.
Wrap-up
And there you have it! You now know the main components of GitHub Actions CI pipeline, and how to build one. I hope you found this article applicable to your own project. If you have any questions or feedback, would love to hear from you on Twitter.