Machine Learning How To: Reproducible and Trackable Training

The investigation and experimentation phase is a common building block in developing any machine learning solution. As the model developer you spend a good chunk of your time doing research on different algorithms, gathering and processing the data, hyper-parameters tuning and so on.
Through this process you may end up adding new data to your original collected dataset, and try various algorithms or tinker with the hyper-parameters of the same algorithm many times.
You may be able to keep track of the differences between a few of these experimental setups with scripts or notebooks that are named first.ipynb, second.ipynb, final.ipynb, final2.ipynb, final_final.ipynb. However, this inefficient process causes a lot of headaches for you and your team when you want to compare results. It also makes it difficult to know which model used which dataset, and decide on which model to push to production.
This blog post is part one of a series covering different aspects of the life-cycle of machine learning in production.
In this post I will go cover the topics listed below:
- The model training process
- How to version control data
- How to version control models
- How to easily compare the performance of different model configurations
- How to write readable, reusable production-ready code for your machine learning pipelines.
For this blog post series, I will be using a small movie review dataset and fit some basic models on it. The goal of these posts is not to optimise the data or model, but to demonstrate how changes in the model development process can be easily tracked and reproduced. All the code used for this blog series can be found on my Github. This post will go through the code inside the ml directory.
Tools and services used
- pyenv: pyenv is a virtual environment manager that allows you to easily install and manage different Python versions in different environments. You can follow the installation instructions from its Github page.
- AWS: S3 for remote data storage
- Git and Github: For tracking code (and later for CI/CD, to be covered in later blog posts)
- Docker: Containerisation is a useful tool providing reproducible environments
- Data Version Control (DVC): An open source tool for tracking data, building ML pipelines, and performance metrics. Its integration with Github makes it very easy to pull the data and run experiments on different git branches.
In the following sections, I will walk through how to build the published project from scratch.
1. Create a Virtual Environment
Create a virtual environment and activate it.
> pyenv virtualenv 3.9 venv
> pyenv activate venv
2. Define the project structure
A project needs to have a well-defined and easy to understand structure. This makes it possible for multiple people to work on a repository without stepping on each other's toes.
An example
The ml directory of the linked repository, has different directories. Each responsible for a specific component of the machine learning project.
ml/
  prepare_data/
    __main__.py
    config.py
  train/
    __main__.py
    config.py
  test/
    __main__.py
    config.py
  metrics/
    model_performance.json
  services/
     predict.py
  .env.example
  Dockerfile
  docker-compose.yml
  dvc.yml
  dvc.lock
  __main__.py
  model_params.py
  requirements.txt
  training_testing_pipeline.sh
Each directory has a __main__.py and a config.py script. The main script is the script responsible for executing a specific task. The task is described by the enclosing directory name. This separation of concerns and distinct naming makes it easy for a new developer to navigate through the code-base.
The config script is responsible for initialising any configurable variables. I include all the environment variables in a .env file. Note that, .env files can contain sensitive information, e.g. secrets, it is therefore important to not push these files to your remote repository. This can be done by including .env (and other files you do not want to be tracked) to .gitignore. However, it is useful to include a list of all environment variables needed for running the code and the values of non-sensitive information in a file that is pushed to the repository. This way anyone else cloning the project will know what to include in their .env file
I have listed all the variables in a file named .env.example. Below are the contents of this file. Notice that the AWS secret and id are listed but the values are not included:
#/ml/.env.example

DATA_PATH=data
DATA_FILE=reviews.tsv
TRAIN_DATA_FILE=train_data.parquet
TEST_DATA_FILE=test_data.parquet
MODEL_PATH=model
MODEL_FILE=lr.model
METRIC_PATH=/ml/metrics
METRIC_FILE=model_performance.json
AWS_SECRET_ACCESS_KEY=__your_aws_access_key__
AWS_SECRET_ACCESS_KEY_ID=__your_aws_secret_key__
A few notes
services/and__main__.pyinclude code for inference which I will cover in the next blog post.- The metrics folder includes the performance metrics on test data. More on that in step 8.
- Details on the Dockerfile and docker-compose file can be found in step 4.
- Details on the DVC related directory and files can be found in steps 7 & 8.
- Details on the shell script can be found in step 8.
3. Write code
After deciding on the project's code structure, it is time to add code. The data preparation and training steps are very specific to the data and problem at hand and the code snippets below are just an example for training a model that will predict positive or negative sentiments given a piece of text.
3.1 Preprocessing
The movie review dataset has two columns: Phrase which is the review of a movie and label which is a rating of 0-4 of the movie. The code snippet below, is the content of the prepare_data/__main__.py script.
#/ml/prepare_data/__main__.py

import pandas as pd

from sklearn.model_selection import train_test_split

from model_params import TrainTestSplit
from .config import Config


def split_train_test_data():
    config = Config()

    # select the reviews with the lowest and highest ratings
    data = pd.read_csv(f"{config.data_path}/{config.data_file}", sep="\t")
    data = data[(data["Sentiment"] == 0) | (data["Sentiment"] == 4)]
    data["labels"] = data.apply(lambda x: 0 if x["Sentiment"] == 0 else 1, axis=1)

    #split the dataset into training and testing data
    data_train, data_test = train_test_split(data, test_size=TrainTestSplit.TEST_SIZE)

    data_train.to_parquet(f"{config.data_path}/{config.train_data_file}")
    data_test.to_parquet(f"{config.data_path}/{config.test_data_file}")


if __name__ == "__main__":
    split_train_test_data()
Notice the use of Config() for configurable variables. All such variables are defined in a config.py script in the same directory. Below is the content of this file:
#/ml/prepare_data/config.py

from os import getenv
from sys import exit

from utils.logger import logger


class Config:
    def __init__(self):
        if getenv("DATA_PATH") is None:
            self.exit_program("DATA_PATH")
        else:
            self.data_path = getenv("DATA_PATH")

        if getenv("DATA_FILE") is None:
            self.exit_program("DATA_FILE")
        else:
            self.data_file = getenv("DATA_FILE")

        if getenv("TRAIN_DATA_FILE") is None:
            self.exit_program("TRAIN_DATA_FILE")
        else:
            self.train_data_file = getenv("TRAIN_DATA_FILE")

        if getenv("TEST_DATA_FILE") is None:
            self.exit_program("TEST_DATA_FILE")
        else:
            self.test_data_file = getenv("TEST_DATA_FILE")

    def exit_program(self, env_var):
        error_message = (f"prepare_data: {env_var} is missing from the set environment variables.")
        logger.error(error_message)
        exit(error_message)
3.2 Training
A very similar structure applies to the training script. Below is an example of using the training dataset created by the preprocessing script and fitting a logistic regression model to it:
#/ml/train/__main__.py

import pandas as pd

from joblib import dump
from sklearn.pipeline import Pipeline
from sklearn.linear_model import LogisticRegression
from sklearn.feature_extraction.text import TfidfTransformer, CountVectorizer

from .config import Config
from model_params import LogisticRegressionConfig


def train():
    config = Config()

    # initialise model parameters
    lr_params = {
        "n_jobs": LogisticRegressionConfig.n_jobs,
        "C": LogisticRegressionConfig.C,
        "max_iter": LogisticRegressionConfig.max_iter,
    }

    # load the training dataset created by prepare_data/
    train_dataframe = pd.read_parquet(f"{config.data_path}/{config.train_data_file}")

    # separate the input text and labels
    X = train_dataframe["Phrase"]
    y = train_dataframe["labels"]

    # define a series of processes that transform input data X
    clf = Pipeline(
        [
            ("vect", CountVectorizer()),
            ("tfidf", TfidfTransformer()),
            ("clf", LogisticRegression(**lr_params)),
        ]
    )
    # fit the model and save it in the model_path
    clf.fit(X, y)
    dump(clf, f"{config.model_path}/{config.model_file}")


if __name__ == "__main__":
    train()
The train function dumps the model to a configurable path. All the configurable variables are defined in config.py in the train/ directory:
#/ml/train/config.py


from os import getenv
from sys import exit

from utils.logger import logger


class Config:
    def __init__(self):
        if getenv("DATA_PATH") is None:
            self.exit_program("DATA_PATH")
        else:
            self.data_path = getenv("DATA_PATH")

        if getenv("TRAIN_DATA_FILE") is None:
            self.exit_program("TRAIN_DATA_FILE")
        else:
            self.train_data_file = getenv("TRAIN_DATA_FILE")

        if getenv("MODEL_PATH") is None:
            self.exit_program("MODEL_PATH")
        else:
            self.model_path = getenv("MODEL_PATH")

        if getenv("MODEL_FILE") is None:
            self.exit_program("MODEL_FILE")
        else:
            self.model_file = getenv("MODEL_FILE")

    def exit_program(self, env_var):
        error_message = (
            f"train: {env_var} is missing from the set environment variables.")
        logger.error(error_message)
        exit(error_message)
3.3 Model Parameters
It is useful to have a script that includes all the model parameters and configurations. This way any model parameter changes will happen in one place only. For the simple logistic regression model used above, I define all the parameters used in train/__main__.py in a LogisticRegressionConfig class and include the split between train and test datasets, used in prepare_data/__main__.py in a TrainTestSplit class. As I make changes to the model or add new models I can add other classes to this script. Below is an example of what is included in ml/model_params.py:
#/ml/model_params.py

class TrainTestSplit:
    TEST_SIZE = 0.2


class LogisticRegressionConfig:
    n_jobs = 1
    C = 1e5
    max_iter = 1000
3.4 Testing
Depending on the problem, a set of performance metrics should be defined. For the sentiment analysis model, I use accuracy and confusion matrix. This is what the content of test/__main__.py looks like:
#/ml/test/__main__.py

import pandas as pd

from json import dump
from joblib import load
from sklearn.metrics import confusion_matrix, accuracy_score

from .config import Config


def test_model():
    config = Config()

    # load the model from the model_path
    model = load(f"{config.model_path}/{config.model_file}")

    # load the test data created by prepare_data/__main__.py
    data_test = pd.read_parquet(f"{config.data_path}/{config.test_data_file}")

    # separate the input from the labels
    X = data_test["Phrase"]
    y = data_test["labels"]

    # make predictions on input text, X
    y_pred = model.predict(X)

    # compute metrics
    accuracy = accuracy_score(y, y_pred)
    true_negative, false_positive, false_negative, true_positive = confusion_matrix(y, y_pred, normalize="true").ravel()

    # save the results in metric_path
    with open(f"{config.metric_path}/{config.metric_file}", "w") as metrics:
        dump(
            {
                "results": {
                    "accuracy": accuracy,
                    "true_negative": true_negative,
                    "false_positive": false_positive,
                    "false_negative": false_negative,
                    "true_positive": true_positive,
                }
            },
            metrics,
        )


if __name__ == "__main__":
    test_model()
Similar to the other directories, all the configurable variables are defined in test/config.py:
#/ml/test/config.py

from os import getenv
from sys import exit

from utils.logger import logger


class Config:
    def __init__(self):
        if getenv("DATA_PATH") is None:
            self.exit_program("DATA_PATH")
        else:
            self.data_path = getenv("DATA_PATH")

        if getenv("TEST_DATA_FILE") is None:
            self.exit_program("TEST_DATA_FILE")
        else:
            self.test_data_file = getenv("TEST_DATA_FILE")

        if getenv("MODEL_PATH") is None:
            self.exit_program("MODEL_PATH")
        else:
            self.model_path = getenv("MODEL_PATH")

        if getenv("MODEL_FILE") is None:
            self.exit_program("MODEL_FILE")
        else:
            self.model_file = getenv("MODEL_FILE")

        if getenv("METRIC_PATH") is None:
            self.exit_program("METRIC_PATH")
        else:
            self.metric_path = getenv("METRIC_PATH")

        if getenv("METRIC_FILE") is None:
            self.exit_program("METRIC_FILE")
        else:
            self.metric_file = getenv("METRIC_FILE")

    def exit_program(self, env_var):
        error_message = (
            f"test: {env_var} is missing from the set environment variables.")
        logger.error(error_message)
        exit(error_message)
3.5 Freeze your dependencies into requirements.txt
As you write and run scripts you need to pip install different packages. In order to reproduce the results on a different machine, a file with a list of the packages and their versions is needed. This file is usually called requirements.txt. Below is the set of libraries used in the example project:
#/ml/requirements.txt

uvicorn[standard]==0.13.4
fastapi==0.68.1
black==21.4b2
mypy==0.812
pandas==1.1.5
pyarrow==5.0.0
scikit-learn==0.24.2
You can either add the packages one by one or create this file automatically by running pip freeze > requirements.txt in your terminal. Note that this command will include all the packages installed in your virtual environment and not just those used in your project.
4. Create a docker image
Another tool that helps with the reproducibility of a machine learning pipeline, and any pipeline for that matter, is Docker. You can install docker by following instructions from docker's website.
Below is an example of a Dockerfile you can use for training:
#/ml/Dockerfile

FROM python:3.9-slim as py39slim
RUN apt-get update -y && apt-get install -y git

WORKDIR /ml

# copy over the requirements.txt file and install all requirements
COPY ./ml/requirements.txt /ml
RUN pip install -r requirements.txt --no-cache-dir

# copy over the ml directory
COPY ./ml /ml

ENTRYPOINT ["/bin/bash", "-c"]
With multiple environment variables in the code, I find it easier to write a docker-compose.yml file that copies over all the variables from .env rather then including them in a docker run command. Here is an example of a docker-compose.yml file:
#/ml/docker-compose.yml

version: '3.8'
services:
  sentiment.ml:
    build:
      context: ./..
      dockerfile: ml/Dockerfile
    environment:
      - DATA_PATH=${DATA_PATH}
      - DATA_FILE=${DATA_FILE}
      - TRAIN_DATA_FILE=${TRAIN_DATA_FILE}
      - TEST_DATA_FILE=${TEST_DATA_FILE}
      - MODEL_PATH=${MODEL_PATH}
      - MODEL_FILE=${MODEL_FILE}
      - METRIC_PATH=${METRIC_PATH}
      - METRIC_FILE=${METRIC_FILE}
    volumes:
      - ./data:/ml/data
      - ./metrics:/ml/metrics
      - ./model:/ml/model
      - ./prepare_data:/ml/prepare_data
      - ./train:/ml/train
      - ./test:/ml/test
      - ./../shared_utils/logger:/ml/utils/logger
5. Install DVC
Follow the instructions on DVC's website on how to install. I installed it in my virtual environment using pip:
> pip insall dvc
> pip install 'dvc[s3]'  #Needed for working with boto3
6. Gather your dataset and upload it to a remote storage space
I uploaded the example dataset to an S3 bucket, named sent-analysis.
7. Setup DVC
7.1 Initialisation
If you have cloned the repository, DVC is already initialised in the ml folder; however, if you are working on a project from scratch you will need to initialise it by running dvc init. This will create a .dvc/ directory in the project.
7.2 Link to remote storage
For your data to be accessible from different environments you can save your data in a remote storage location, e.g. s3 a and link DVC to it by running:
dvc remote add s3-remote s3://<bucket_name>/
You will notice a config file in the .dvc/ directory created linking to the above remote storage. This makes it very easy to push and pull data to your s3 bucket. For example, a coworker can easily download the dataset on their local machine by running dvc pull in the cloned repository. If any changes are made to the data on your local machine, you can sync the remote data by running dvc push.
8. Create pipelines
What?
A pipeline is a well-structured and easily maintainable workflow. Each pipeline is made from multiple steps, or stages as referred by DVC.
Why?
In a machine learning pipeline, all the artefacts need to be traceable, and any change in any stage should trigger the reproduction of all the affected stages.
How?
You can create stages with DVC using dvc run. The name, input, and output of each stage can be defined in this command. Running a stage creates a dvc.yml file that includes all the dependencies of the corresponding stage (and the other stages that are run in the project).
Take for example the model testing step. To create a stage, all the data, scripts, outputs that should be tracked are included in the stage definition:
dvc run -n test_model \
-d test/__main__.py \
-d data/test_data.parquet \
-d model/lr.model \
-M metrics/model_performance.json \
docker-compose run sentiment.ml "python -m test ."
Note the different tags used in the snippet above, -n is the name tag assigned to this example stage. All the stage dependencies, i.e. the script that should be run to test the model (test/__main__.py), test_data.parquet, and lr.model are tagged with -d. The performance metric file is given the metrics tag, -M.
In a training pipeline, the testing stage is usually the last step after pulling the data, preprocessing it and training a model. Each step can be created with dvc run similar to the test stage above. By defining all the dependencies in each stage, any change to an artefact will propagate across all effected stages.
Define pipeline stages in a shell script
Running different dvc run commands from the terminal one by one will make it hard for reproducing and modifying the stages. I find it easier to include all stages in a shell script. That way all the stages are in one place, can be easily reproduced from another machine, modified and version controlled with Git.
The shell script training_testing_pipeline.sh in the repository includes all the stages. Each stage can be run individually by running ./training_testing_pipeline.sh <stage_name> inside the terminal from the ml directory. Alternatively, all stages can be run together by excluding the stage or by running dvc repro.
Below is a description of each stage in the order they should run:
Pulling data
if [[ "$*" =~ "pull_data_from_s3" ]]; then
   dvc run -n pull_data_from_s3 \
   -d s3://sent-analysis/reviews.tsv \
   -o ./data/reviews.tsv \
   aws s3 cp s3://sent-analysis/reviews.tsv ./data/reviews.tsv
fi
The first stage, pull_data_from_s3 is responsible for pulling the data from the remote storage, s3, and saving it to a specified path, in this case, data/. Running this stage will create a data/ directory in your local repository and download the dataset, reviews.tsv to it (Assuming you have included this file in an s3 bucket named sent-analysis and have set it up as the remote storage in step 7.2). Note that the output, ./data/reviews.tsv is tagged with -o.
Running this stage will create/add details to dvc.yaml:
pull_data_from_s3:
  cmd: aws s3 cp s3://sent-analysis/reviews.tsv ./data/reviews.tsv
  deps:
    - s3://sent-analysis/reviews.tsv
  outs:
    - ./data/reviews.tsv
Another file that gets created/modified with running a stage is, dvc.lock. This file contains the md5 hash values for each artefact which allows for changes in any part of the pipeline to be tracked, i.e. any change results in a change in the hash value which can then trigger all the dependencies to be recomputed and get new hash values. I will show this in an example in the following section. Below is the output of dvc.lock from running the pull_data_from_s3 stage:
pull_data_from_s3:
  cmd: aws s3 cp s3://sent-analysis/reviews.tsv ./data/reviews.tsv
  deps:
    - path: s3://sent-analysis/reviews.tsv
      etag: d8a6be2d1deb19f9cd76f1b69a793b5f
      size: 8481022
  outs:
    - path: ./data/reviews.tsv
      md5: d8a6be2d1deb19f9cd76f1b69a793b5f
      size: 8481022
Preparing data
Now that the dataset is pulled from the remote storage, it is time for the preprocessing step.
if [[ "$*" =~ "prepare_data" ]]; then
   dvc run -n prepare_data \
   -d data/reviews.tsv \
   -d prepare_data/__main__.py \
   -o data/train_data.parquet \
   -o data/test_data.parquet \
   docker-compose run sentiment.ml "python -m prepare_data ."
fi
A few things to note:
data/reviews.tsvwas an output in the previous stage but is a dependency in this stage. This follows the logical flow of data in the pipeline, i.e. the data is collected and passed down to the preprocessing step. Declaring the dependency ofprepare_dataonreviews.tsvmeans that any change to the data which is identified by the md5 hash indvc.lockwill trigger its dependent stage,prepare_datato run again.- A stage can have multiple outputs, in this case, training data and testing data.
- The command at this stage is run in docker through docker-compose.
Let's take a look at thedvc.lockcontent created after running this stage:
prepare_data:
  cmd: docker-compose run sentiment.ml "python -m prepare_data ."
  deps:
   - path: data/reviews.tsv
     md5: d8a6be2d1deb19f9cd76f1b69a793b5f
     size: 8481022
   - path: prepare_data/__main__.py
     md5: fd698d5634e84fe9ea713e10c59154ca
     size: 719
  outs:
   - path: data/test_data.parquet
     md5: a9a52c60878a1cc92cef68ee8a4eaaae
     size: 206588
   - path: data/train_data.parquet
     md5: 57fe388a9b3d96ed734ddad601941a53
     size: 808111
Notice that reviews.tsv is identified with same md5 hash, d8a6be2d1deb19f9cd76f1b69a793b5f, from the previous stage. These unique hashes make it possible to pinpoint discrepancies in the machine learning pipeline in regards to different versions of artefacts being included in different stages.
Training the model
The previous stages have created the data needed to train the model. Now we can run the scripts inside the train directory and create a model.
if [[ "$*" =~ "train_model" ]]; then
   dvc run -n train_model \
   -d train/__main__.py \
   -d data/train_data.parquet \
   -o model/lr.model \
   docker-compose run sentiment.ml "python -m train ."
fi
Note that the training script fits a logistic regression model on the data and saves the model in a model directory which is tracked via the output tag and gets a unique md5 hash attached to it in dvc.lock. Below is the output of dvc.lock from running this stage:
 train_model:
  cmd: docker-compose run sentiment.ml "python -m train ."
  deps:
   - path: data/train_data.parquet
     md5: 57fe388a9b3d96ed734ddad601941a53
     size: 808111
   - path: train/__main__.py
     md5: 0b044356b96a8419fcd64ba7087c225d
     size: 939
  outs:
   - path: model/lr.model
     md5: afb779dc7ffb7b659c1d16937c57b910
     size: 373778
Testing the model
This stage is important for both evaluating the model and also comparing this model with other candidate models.
if [[ "$*" =~ "test_model" ]]; then
   dvc run -n test_model \
   -d test/__main__.py \
   -d data/test_data.parquet \
   -d model/lr.model \
   -M metrics/model_performance.json \
   docker-compose run sentiment.ml "python -m test ."
fi
As seen, the test_model stage is dependent on all previous stages.
Note that the output of the performance evaluation script is tagged with the metrics tag, -M.
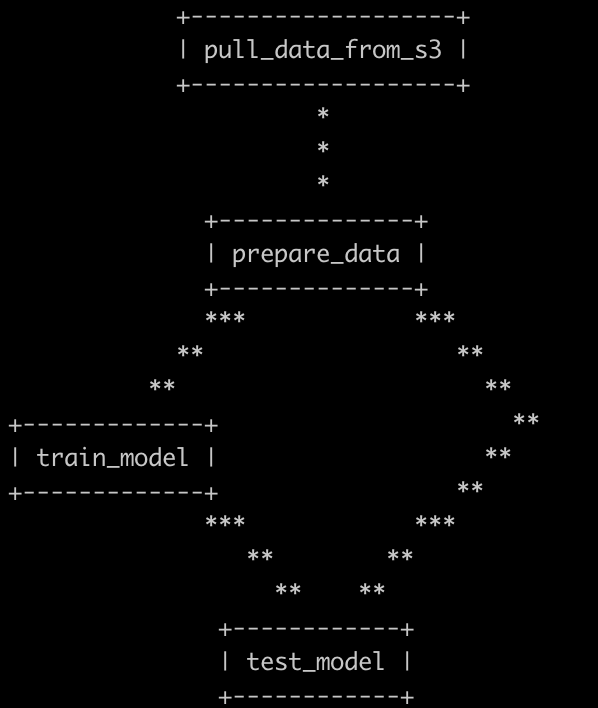
9. Visualise the pipeline flow
Now that all training and testing stages have been defined, we can visualise the flow of data in the pipeline by running dvc dag:
10. Run experiments and compare results
It is time to see the pipeline's value in action. Let's consider two scenarios:
Modifying the model's hyper-parameters
Say that you have trained the model by running the shell script, but want to make changes to its hyper-parameters. Let's see how we can easily switch between versions of the model like switching between different code versions on Git branches.
For illustration purposes, I branched off of main by creating a branch named exp and tweaked the test size in model_params.py. This should trigger recomputation of all three stages, prepare_data, train_model and test_model.
I will run the pipeline as an experiment, with this command dvc exp run -n more-test-data --no-run-cache. Note that more-test-data is a name I gave to this experiment.
As expected, this command skips the first stage of the pipeline since the dataset has not changed. Below is the output from the terminal:
Stage 'pull_data_from_s3' didn't change, skipping
Running stage 'prepare_data':
> docker-compose run sentiment.ml "python -m prepare_data ."
Creating ml_sentiment.ml_run ... done
Updating lock file 'dvc.lock'

Running stage 'train_model':
> docker-compose run sentiment.ml "python -m train ."
Creating ml_sentiment.ml_run ... done
Updating lock file 'dvc.lock'
Running stage 'test_model':
> docker-compose run sentiment.ml "python -m test ."
Creating ml_sentiment.ml_run ... done
Updating lock file 'dvc.lock'
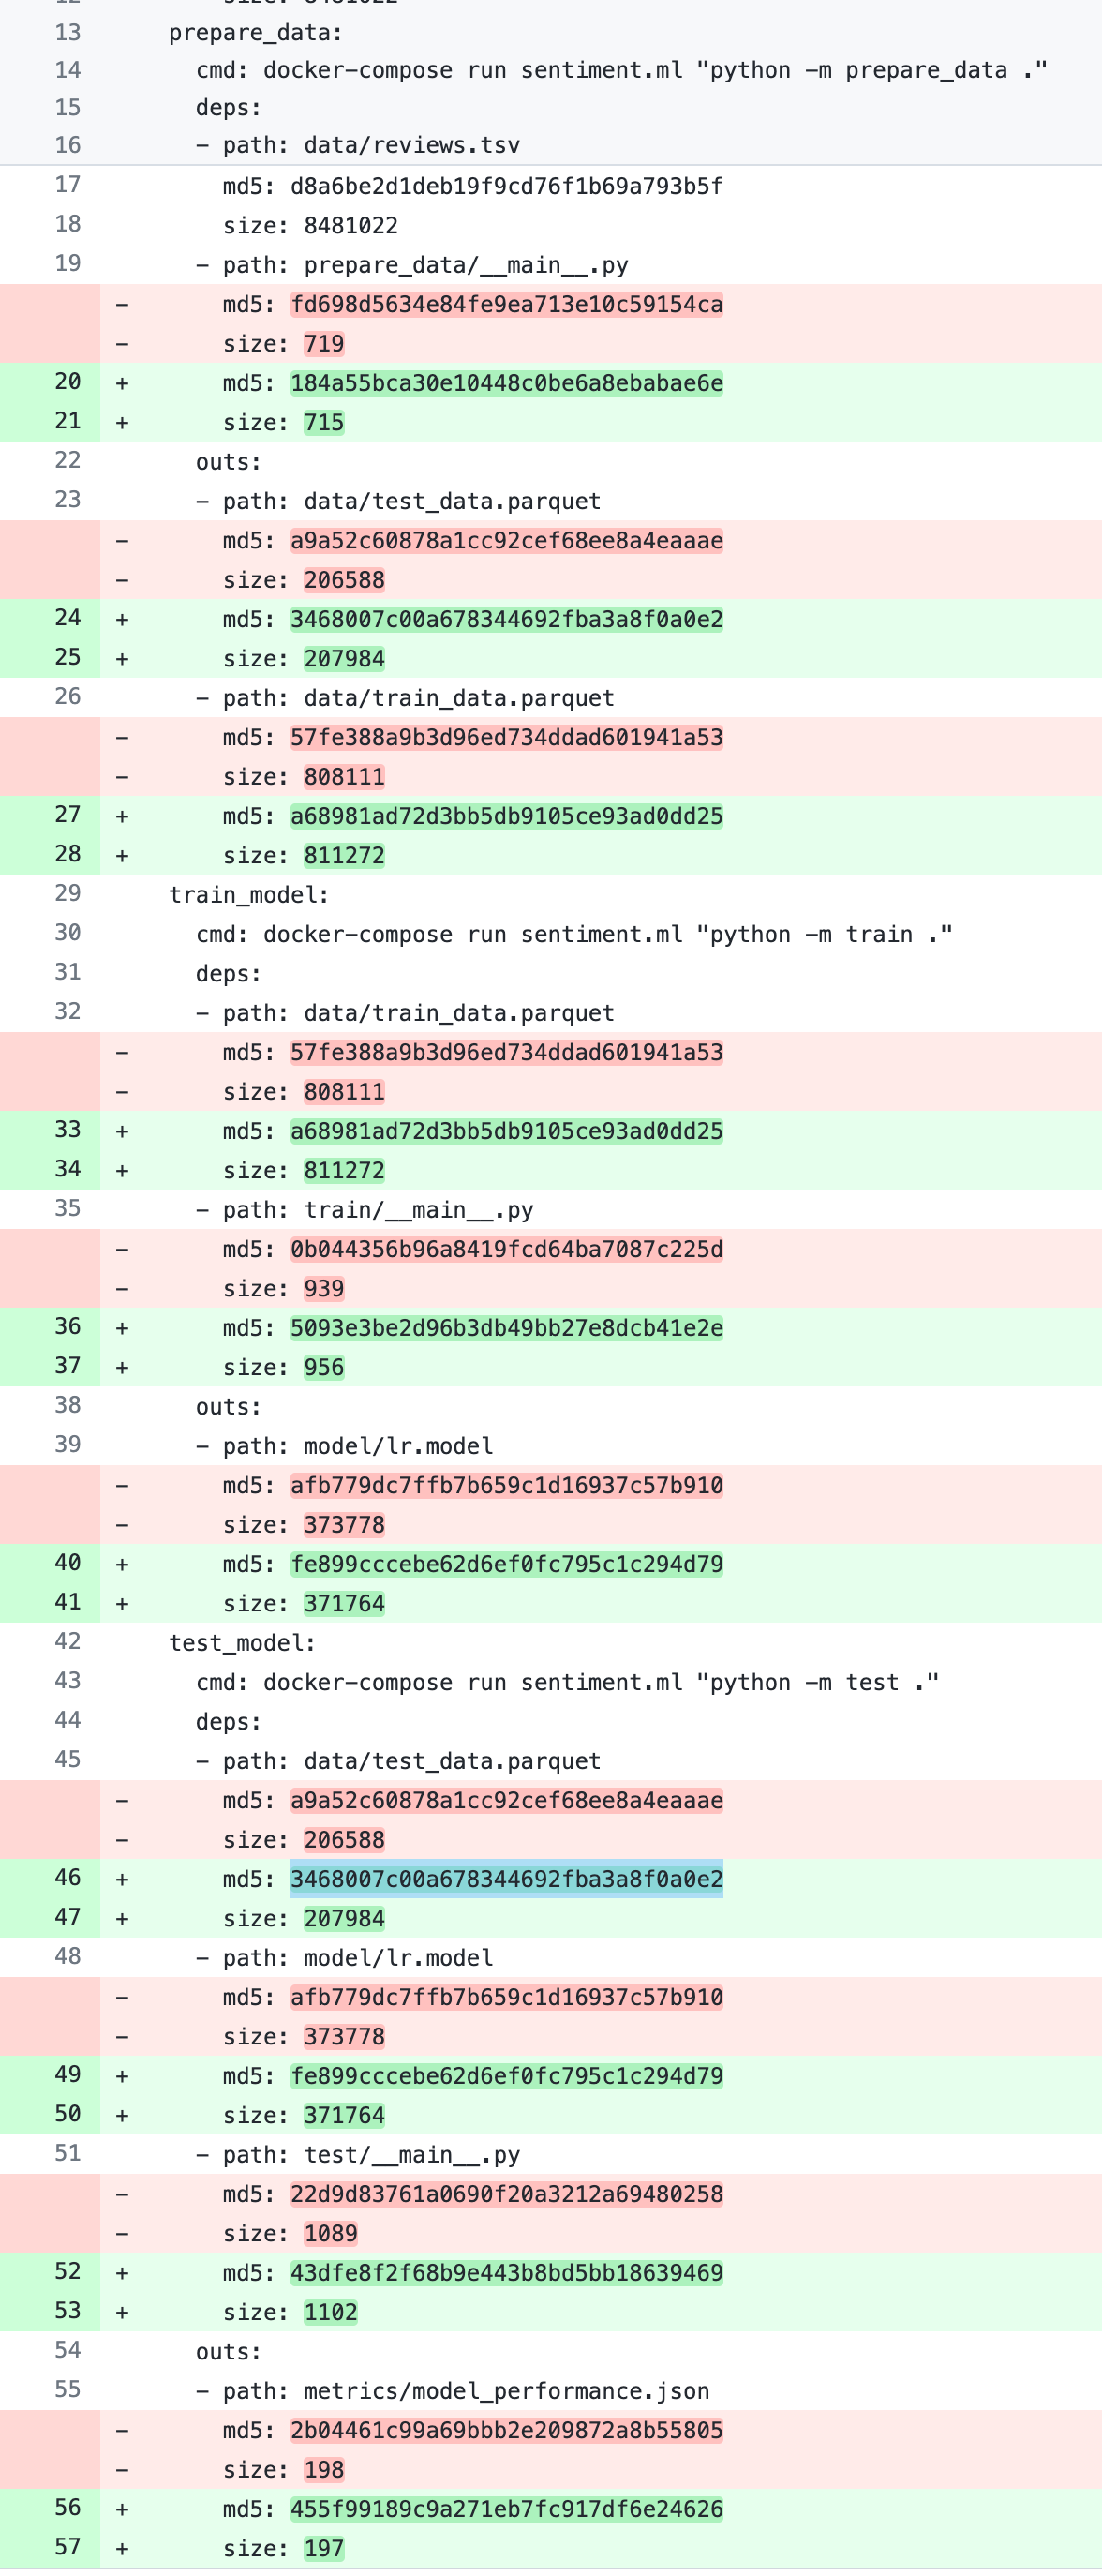
The results of this experiment can be compared with the main branch, and other experiments (if any) by running dvc exp show. Below is a screenshot of the result:

This experiment produced three new files that are tracked by DVC, train_data.parquet, test_data.parquet and lr.model. This means that the hashes of these files have also been updated in dvc.lock. The image below shows the changes in the lock file.
I add the changed files to git and push them to the remote repository. I then run dvc push to push the three DVC tracked files to the remote storage.
This allows anyone else working on this code to access both sets of files just by switching the branches and pulling the corresponding data from DVC. In other words, when a coworker checks out the exp branch and runs dvc pull the dvc.lock file dictates which versions of the three train, test and model files should be downloaded.
Comparing different models
Now let's change the training model. For this, I branch off of the main branch, svm-exp, modify the main script inside the train folder and fit an svm model instead of the logistic regression model.
This change should only affect the last two stages as it relates to training and testing the model on the same data produced by prepare_data. Below is the output of training an svm model and running dvc exp show. As seen we can easily compare the results of the main branch with the other two experiments, one from increasing the test data and one from training and different model. It is clear from the results of the svm model that the changes made in the svm-exp experiment outperform the other two.
Now I can add the changes and push the DVC tracked files, create a pull request on Github and get the better performing model merged.

In this blog post, I described the steps to generate easy-to-read, reproducible code for training machine learning models. The next posts will build on top of this article and discuss the next steps after deciding on the model for production use.
I hope you enjoyed this post and use some of these ideas in your own projects. If you like reading about machine learning and natural language processing, follow me on twitter for more content!