Machine Learning How to: ML as a Service

In the previous article, I discussed the details of building a trackable and reproducible machine learning training pipeline. In this article, I will focus on how to use a trained model as a service in an application.
Motivation
There are more steps beyond finding the right model with the tuned hyper-parameters in a machine learning project. Once a model is trained and tested, it needs to be deployed. The model is usually part of a larger application; for example, YouTube generating suggestions for what to watch next.
The purpose of this article is to take a trained model and have it communicate with an application's backend server through an API in a local environment.
All the code snippets in this blog post can be found in the mlseries repository on my Github.
Note that the code snippets in this post are built on top of the previous article where I did a walk-through of a basic machine learning project's structure.
Below is a tree illustration of all the directories inside the repository:
├── README.md
├── deploy
│   ├── Dockerfile.ml.local
│   ├── Dockerfile.sent_ml
│   ├── Dockerfile.server
│   ├── Dockerfile.server.local
│   └── docker-compose.local.yml
├── integration_tests
├── ml
│   ├── Dockerfile
│   ├── conftest.py
│   ├── data
│   │   ├── reviews.tsv
│   │   ├── test_data.parquet
│   │   └── train_data.parquet
│   ├── docker-compose.yml
│   ├── dvc.lock
│   ├── dvc.yaml
│   ├── entities
│   │   └── review.py
│   ├── metrics
│   │   └── model_performance.json
│   ├── ml_main.py
│   ├── model
│   │   └── lr.model
│   ├── model_params.py
│   ├── prepare_data
│   │   ├── __main__.py
│   │   └── config.py
│   ├── requirements.txt
│   ├── services
│   │   └── predict.py
│   ├── test
│   │   ├── __main__.py
│   │   └── config.py
│   ├── tests
│   │   ├── integration_tests
│   │   │   └── test_ml_main.py
│   │   └── unittests
│   │       ├── prepare_data
│   │       │   └── test_prepare_data.py
│   │       ├── services
│   │       │   └── test_predict.py
│   │       └── train
│   │           └── test_train.py
│   ├── train
│   │   ├── __main__.py
│   │   └── config.py
│   ├── training_testing_pipeline.sh
│   └── utils
│       └── config.py
├── pytest.ini
├── server
│   ├── config.py
│   ├── conftest.py
│   ├── entities
│   │   └── review.py
│   ├── requirements.txt
│   ├── server_main.py
│   ├── tests
│   │   └── integration_tests
│   │       └── test_server_main.py
│   └── utils
│       └── logger
├── shared_utils
│   ├── logger
│   │   └── __init__.py
│   └── unittest
│       └── utils
│           └── logger
│               └── __init__.py
└── tasks.py
The Architecture
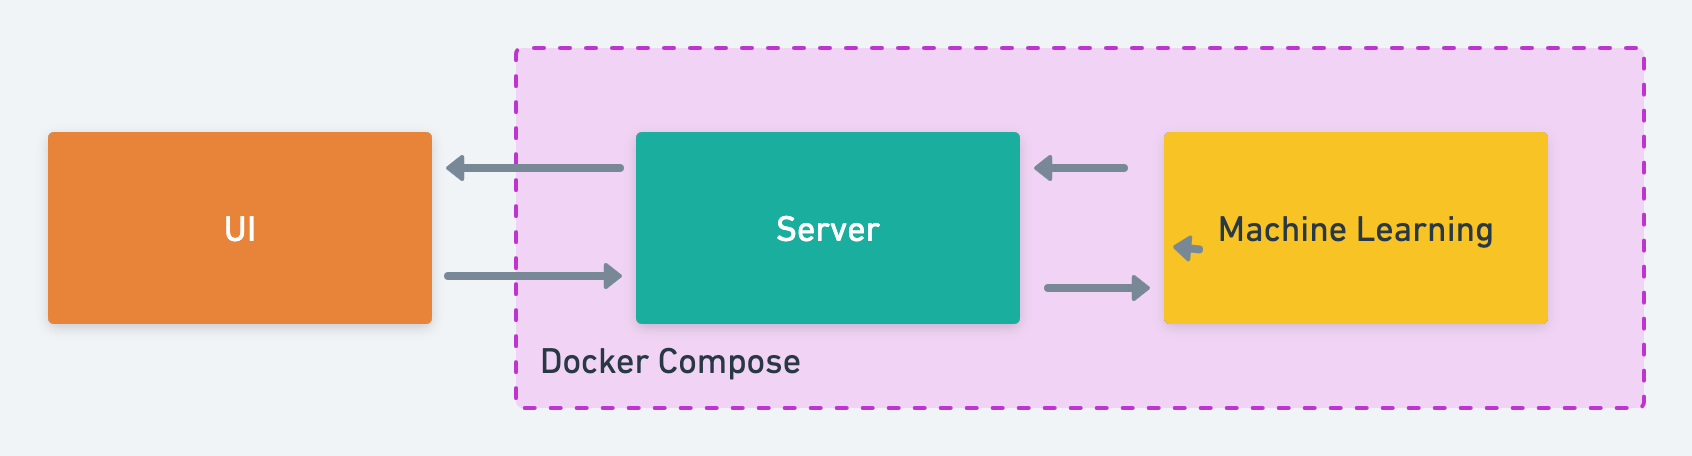
The figure below illustrates the architecture of a simple web application. There are three containers, the server container, the machine learning container and the front-end container. The server is the core of the application. Think of it as the brain of the app. The machine learning container exposes the model to the rest of the application. It can receive and send back information to the server. The front-end container includes any user interface-related code.
Note that I will not be covering the UI container as it does not directly interact with the ML container.
Docker compose is used to create and run all the containers together.
The Design
ML Service
Let's start with the machine learning component of the app. The goal is to have the machine learning container receive requests for inference from the server and return its predictions.
I call this the prediction service. In the code repository, I add a services/ directory and create a predict.py script with the contents below:
# /ml/services/predict.py
import numpy as np

from joblib import load

from entities.review import Review
from utils.config import Config
from utils.logger import logger


class PredictService:
    """
    A class serving a trained model for prediction requests

    Methods:
        infer(review: Review) runs inference on a review and sends
                    back the sentiment and a prediciton score from 1-100
    """
    def __init__(self):
        """
        Loads the env vars and the trained model
        """
        self.config = Config()
        self.model = load(f"{self.config.model_path}/{self.config.model_file}")

    def predict(self, review: Review):
        """
        Runs inference on a review and sends back the sentiment and a prediciton
        score from 1-100

        Args:
            review(Review): a Review entity which contains text for prediction

        Returns:
            response(dict): a dictionary with the predicted positive or negative
                            sentiment and an associated prediciton score
        """
        response = dict()
        X = review
        response["prediction"] = "positive" if self.model.predict(np.array([X]))[0] else "negative"
        positive_prediction_score = np.round(self.model.predict_proba(np.array([X]))[0][1] * 100, 3)
        response["prediction_score"] = positive_prediction_score if response["prediction"] == "positive" else 100 - positive_prediction_score

        logger.info("Completed prediction on review: %s", response)
        return response
To ensure that PredictService always receives the expected input, I define a Review model that inherits from pydantic's BaseModel. Pydantic is a useful tool for validating the input to an endpoint. For example, using the Config class, I have set the minimum acceptable length for the input. If the input is 3 characters or less, an error is raised with a message: ensure this value has at least 4 characters.
# /ml/entities/review.py

from pydantic import BaseModel

class Review(BaseModel):
    text: str

    class Config:
        """
        Controls the behaviour of the Review class
        """
        min_anystr_length = 4
        error_msg_templates = {
            'value_error.any_str.min_length': 'min_length:{limit_value}',
        }
ML API
I will be using FastAPI for writing the APIs. It is fast and easy to use.
To begin, I will add a ml_main.py script and create an instance of FastAPI named app. All the routes will be using app.
# /ml/ml_main.py

from fastapi import FastAPI, status

from services.predict import PredictService
from utils.logger import logger
from entities.review import Review

app = FastAPI()

predict_service = PredictService()


@app.post("/prediction_job/", status_code=status.HTTP_201_CREATED)
def add_prediction_job(review: Review):
    """
    This endpoint receives reviews, sends it to the
    prediction service for prediction and returns the response

    Args:
        review(Review): the input should conform to the Review model

    Returns:
        response(dict): response from predict_service which includes
                        prediction details
    """
    response = predict_service.predict(review.text)
    return response
As shown in the above code snippet, after initializing the app, PredictService(), a POST endpoint is defined that receives a review as the input, sends it to ML's predict_service for inference and returns the prediction back to its caller.
Server API
As mentioned in the architecture section, the server is the main receiver and responder to client requests. In other words, the UI posts the user's review to the server through a POST request, which makes a POST request to the machine learning container. ML in turn makes a call to its PredictService. The series of requests are illustrated below:

I create a server directory in the root of the repository and similar to the ML API, add a server_main.py script to initiate a FastAPI() instance and include the endpoints for the server container (see tree illustration at the beginning of the article for an overview of the repository's folder structure).
To accept reviews from the user and make predictions on its sentiment, I add a POST endpoint with the path review_sentiment. This endpoint expects a string as input. It creates a payload for the ML's endpoint, which must conform to the Review class, and sends it to the ML endpoint. The response from ML's endpoint is returned and any exceptions are caught.
# /server/server_main.py
import re

import requests
from config import Config
from entities.review import Review
from fastapi import FastAPI, HTTPException, status

app = FastAPI()
config = Config()


@app.post("/review_sentiment/", status_code=status.HTTP_200_OK)
def add_review(review: Review):
    """
    This endpoint receives reviews, creates an appropriate
    payload and makes a post request to ml's endpoint for a
    prediction on the input

    Args:
        review(Review): the input should conform to the Review model

    Returns:
        response(dict): response from ml's endpoint which includes
                        prediction details

    Raises:
        HTTPException: if the input is a sequence of numbers
    """
    endpoint = f"{config.ml_base_uri}/prediction_job/"
    if re.compile(r"^\-?[1-9][0-9]*$").search(review.text):
        raise HTTPException(status_code=422, detail="Review cannot be a number")

    resp = requests.post(endpoint, json=review.dict())
    return resp.json()
Containerisation & Composition
As illustrated in the design, the server and machine learning code should be isolated in separate containers. Let's create a deploy/ directory and add two Dockerfiles for the local development environment.
For the toy application covered in this article, the instructions in the Dockerfiles are as simple as installing a light Python version, copying over the code from the repository and installing the packages:
#/deploy/Dockerfile.server.local
FROM python:3.9-slim as py39slimbase

WORKDIR /server
COPY ./server/requirements.txt /server
RUN pip install -r requirements.txt

COPY ./server /server
Similarly, for the ML container:
#/deploy/Dockerfile.ml.local
FROM python:3.9-slim as py39slim

WORKDIR /ml
COPY ./ml/requirements.txt /ml
RUN pip install -r requirements.txt

COPY ./ml /ml
Docker Compose is used to have these two containers communicate with each other, and send requests back and forth as illustrated in Fig. 2.
I add a docker-compose.local.yml script in the deploy/ directory and define two services, sentiment-analysis-ml and sentiment-analysis-server.
services:
  sentiment-analysis-ml:
    container_name: ml
    build:
      context: ../
      dockerfile: deploy/Dockerfile.ml.local
    command: uvicorn ml_main:app --host 0.0.0.0 --port 3000 --reload
    environment:
      - MODEL_FILE=${MODEL_FILE}
      - MODEL_PATH=${MODEL_PATH}
    deploy:
      replicas: 1
      restart_policy:
        condition: on-failure
    volumes:
      - ../ml/:/ml/
      - ../shared_utils/logger:/ml/utils/logger

  sentiment-analysis-server:
    container_name: server
    build:
      context: ../
      dockerfile: deploy/Dockerfile.server.local
    command: uvicorn server_main:app --host 0.0.0.0 --port 8000 --reload
    environment:
      - ML_BASE_URI=${ML_BASE_URI}
    deploy:
      replicas: 1
      restart_policy:
        condition: on-failure
    volumes:
      - ../server/:/server/
      - ../shared_utils/logger:/server/utils/logger
    ports:
      - 8000:8000
The command uvicorn main:app refers to the fastAPI app defined in the main.py scripts for each server and ML service. I have set ML to listen on port 3000 by adding --port 3000. This is the port that the server needs to use to send requests to ML. The combination of the container_name and --port 3000 determines the base url for the ML container, http://ml:3000. The server needs to hit http://ml:3000/prediction_job/ for getting predictions.
Running the app locally
With docker-compose, all images are built and containers are run with one command: docker-compose up. After the images are built from the Dockerfiles and the containers are running, the output below is expected in the terminal:
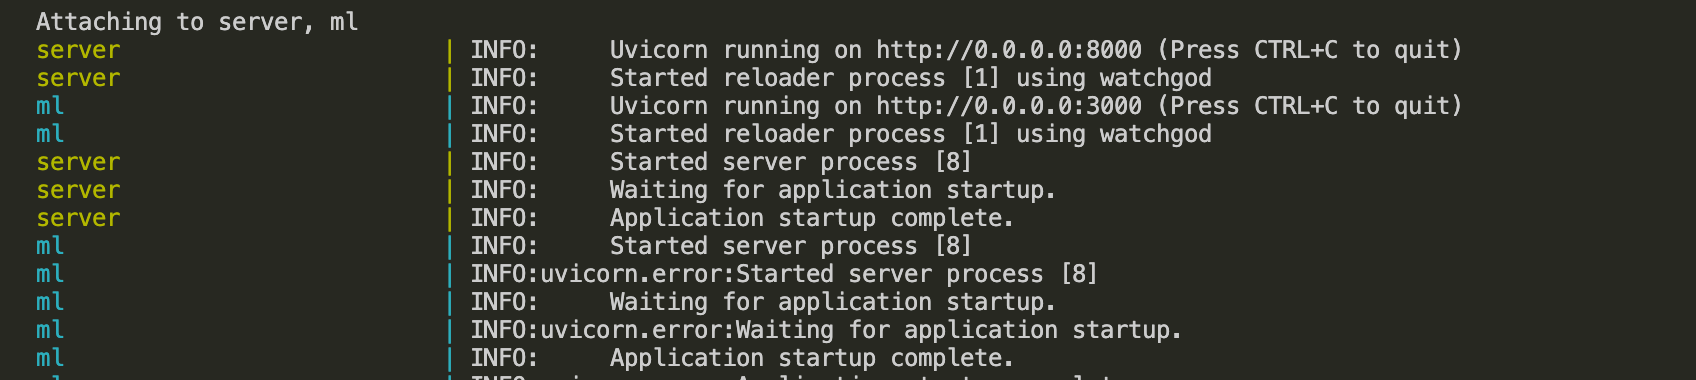
As seen in the figure above, the server is running on http://0.0.0.0:8000.
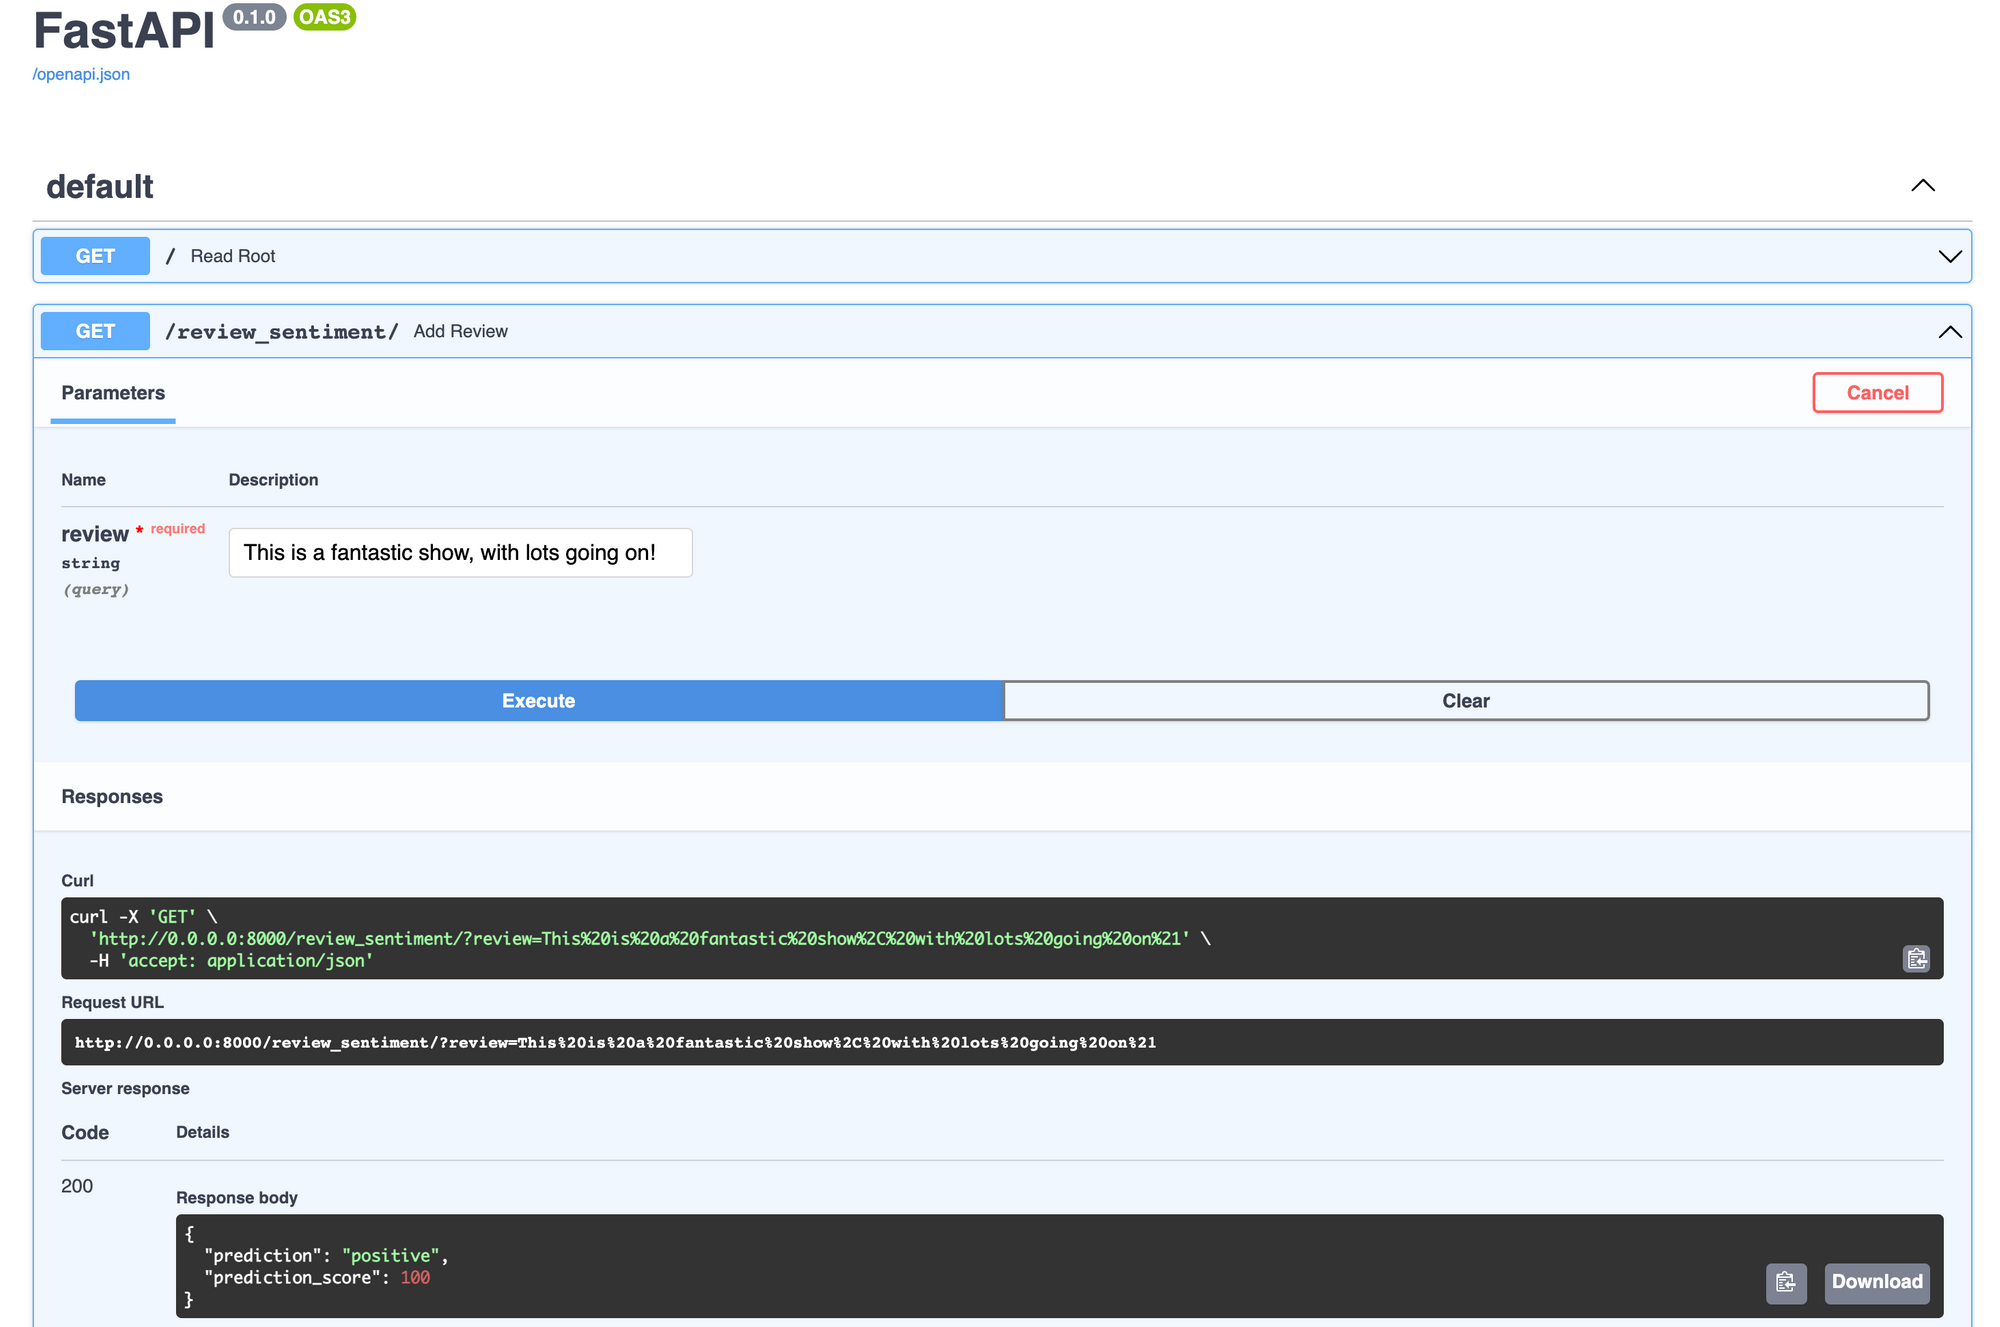
FastAPI has interactive documentation of all the implemented APIs in the docs/ path. Head over to http://0.0.0.0:8000/docs and click on Try it Out under prediction GET request. You can type in a comment and a successful response will show the predicted sentiment and score.
Wrap up
That is it for this blog post. I went over building a simple machine learning application using fastAPI and how to run it locally. There are many improvements that can be made to the simple app built in this article. For instance, implementing queues for ML requests, and authorisation for accessing APIs.
I hope you enjoyed this post and use some of these ideas in your own projects. If you like reading about machine learning and natural language processing, follow me on twitter for more content!